How Long Does It Take to Install a Solar System on a Villa: A Step-by-Step Guide
One of the first questions future solar system owners ask is: “How long does the installation take?”. This is often understood as simply installing panels on the roof, but the actual project involves much more. It includes roof inspection, analysis of the building’s electrical infrastructure, an energy audit, system design, equipment selection, coordination with regulatory authorities, the installation itself, and commissioning. Every project is unique, and duration depends on many factors, but the main stages are always the same. Based on Siriteja Energy’s experience, most projects generally follow the timing outlined below.
Stage 1. Initial Contact and Basic Data Collection
The project begins with the client’s inquiry and us understanding the task at hand.
We clarify with the owner why they want a solar installation: some clients want to reduce their electricity bills; others prioritize backup power during outages; or they might be preparing the house for rental or future load expansion etc. As a result of this conversation we determine the architecture of the future system: is it a standard grid-tied system, a hybrid with battery storage, or a more complex configuration with EMS.
The engineers collect the basic data: roof configuration, electricity bills, type of grid connection, whether the building is occupied year-round or only seasonally, whether there is a swimming pool, large air conditioning systems, pumps, EV chargers, and other major loads.
At this stage, a remote assessment is often sufficient: roof photos, recent PEA bills, and a short interview with the owner. We evaluate whether the project is viable and which details need to be clarified on site.
The first stage usually takes 3 to 7 days.
Stage 2. Energy Audit
This is where the project’s technical and economic rationale is established. Every one of our projects begins with the question: “How does the property actually consume energy?”
A common mistake in Thailand’s solar market is installing a system with a “one-size-fits-all” approach without a sufficiently detailed analysis of actual energy consumption. A proper energy audit is not just studying bills – it also includes field measurements, phase load analysis, consumption peak assessment, modeling different operating scenarios. A major part of it is load profile analysis: how much electricity the property consumes throughout the day on an hour-by-hour basis, when consumption is highest and lowest, how the air conditioning system operates, how much energy is used by the swimming pool, water pumps, kitchen equipment, EV charging, and where energy is used inefficiently due to outdated equipment, leaks, or inefficient use. Future increases in electricity demand, such as EV charging, are also taken into account.
In Southern Thailand, a significant portion of electricity costs is often related to daytime loads – primarily air conditioning systems and pool pumps. If the property actively consumes energy during the day, most of the solar generation will be consumed on site, and the system will be very efficient financially. If most of the load occurs after sunset, the economics may look completely different without a battery.
As a result of the energy audit, engineers calculate:
- The optimal system size
- Whether a hybrid inverter is required or a standard grid-tied system is sufficient
- Whether the use of energy storage is justified
- Whether EMS is needed for load management
- The realistic payback period
An energy audit usually takes 7-30 days. But some projects take longer to collect the data. For properties with complex consumption profiles, the audit may take up to a month.
Stage 3. Roof and Electrical Inspection
After the energy audit, engineers move on to the technical inspection of the property. Where the energy audit defines what kind of system is needed, the technical inspection tells us whether it can be installed safely and correctly?
What is checked during the roof inspection
- Roof condition
- Condition of the supporting structures
- Corrosion, cracks, leaks, and deformation
- How much additional weight the roof can support
- Roof geometry
- Shading from neighboring buildings, trees, and rooftop equipment
- Wind loads
- Mounting points for the installation system
- Accessibility for installation and maintenance
In coastal areas of Southern Thailand, humidity, salt mist, and corrosion exposure on fasteners and metal structural components are also taken into account.
What is included in the electrical infrastructure inspection
- Condition of the main distribution board
- Existing connection layout
- Incoming electrical capacity
- Load distribution across phases
- Condition of breakers and protection devices
- Presence and quality of grounding
- Existing cable cross-sections and routing
- Inverter and batteries installation locations
- Whether dedicated backup circuits can be implemented
Engineers also determine whether the switchboard requires upgrading, cables need replacement, or certain sections of the system require reinforcement.
The technical inspection takes about 1 day. In complex cases, additional site visits may be required.
Stage 4. System Design and Equipment Selection
Based on the inspection results, engineers plan the panel layout on the roof, develop the electrical design, determine cable parameters and protection devices, select the inverter, mounting system, and other equipment. They also prepare technical documentation for installation and coordination with PEA. For hybrid systems, backup circuits, battery operating logic, and emergency power schemes are additionally designed.
Equipment selection depends on budget, market availability, and climate conditions. For example, in coastal areas, salt mist resistant panels and anodized aluminum frames are recommended for corrosion protection.
The design stage depends on project complexity, but for a typical villa it usually takes 2-3 weeks. Sometimes longer if equipment delivery is delayed by the manufacturer: inverters and panels usually arrive within 7-14 days, but popular models may be in short supply.
Siriteja Energy has its own warehouse in Phuket. This means that for standard projects, component delivery takes less time and does not depend on international logistics.
Stage 5. Approvals and Documentation
The least transparent part of the project is interaction with government authorities. In the past, solar system owners in Thailand had to obtain building modification permits and factory licenses – the process could take up to six months. In 2024-2025, the procedure was significantly simplified: for most residential installations, factory licenses and construction permits are no longer required, and it is sufficient to notify local authorities one month in advance.
However, grid connection still requires approval from the Provincial Electricity Authority (PEA) or Metropolitan Electricity Authority (MEA). The owner prepares required paperwork including:
- Owner ID
- Proof of property ownership
- Technical project documentation
- Resident consent
- Site photographs and connection diagrams
The package is submitted to the local PEA/MEA office. After reviewing the documents, the utility company issues preliminary approval for the installation.
Typical approval time is 2-6 weeks. It is important to note that utility companies do not provide official timelines. Delays are possible due to high application volumes.
Stage 6. Installation
The physical installation is the most visible, but also the shortest part of the project. After PEA/MEA approval and equipment delivery, the installation team brings the modules, inverter, mounting hardware, and cables to the site. Structural rails are installed on the roof, and the solar modules are mounted onto them. DC cables are then routed, protection devices (disconnectors and SPDs) installed, and the inverter and storage system mounted.
For a villa, installation usually takes 2-5 days. In Thailand, heavy rain can sometimes delay the work. Roof characteristics may also affect the schedule.
Stage 7. Inspection, Grid Connection, and Commissioning
When the installation is completed, a government inspector checks the system and issues permission for grid connection. If an agreement for exporting electricity to the grid is signed, the utility company installs a bidirectional meter, although in practice this is still uncommon, as bureaucratic barriers continue to limit full use of this option.
After all formalities are completed, the system is connected to the grid and a trial run is carried out. PEA representatives may be present during commissioning to verify that the project complies with technical requirements.
For commissioning, temporary power shutdowns may occasionally be required.
In Thailand, actual commissioning usually takes place 2-4 weeks after installation is completed, provided no additional corrections are required.
What Affects the Timeline
The actual duration of each stage depends on several factors:
- Roof condition: if roof replacement, reconstruction or structural reinforcement is required, the project may be delayed by 2-4 weeks.
- Equipment availability: popular inverters and batteries sometimes require a waiting period of 2-4 weeks. During the pandemic, delays reached several months.
- Rainy season (May-October): installation is impossible during heavy rain.
- Bureaucratic procedures: PEA may process applications slowly due to a high number of projects. Although regulations have been simplified, some owners still wait 3-6 months for approval.
- Additional work: battery installation, switchboard upgrades, cable tray installation, or installation of additional support structures increase the overall timeline.
- Contractor qualification: experienced EPC companies can inspect the property, design the system, and prepare documentation simultaneously, which speeds up the process.
Total Project Duration
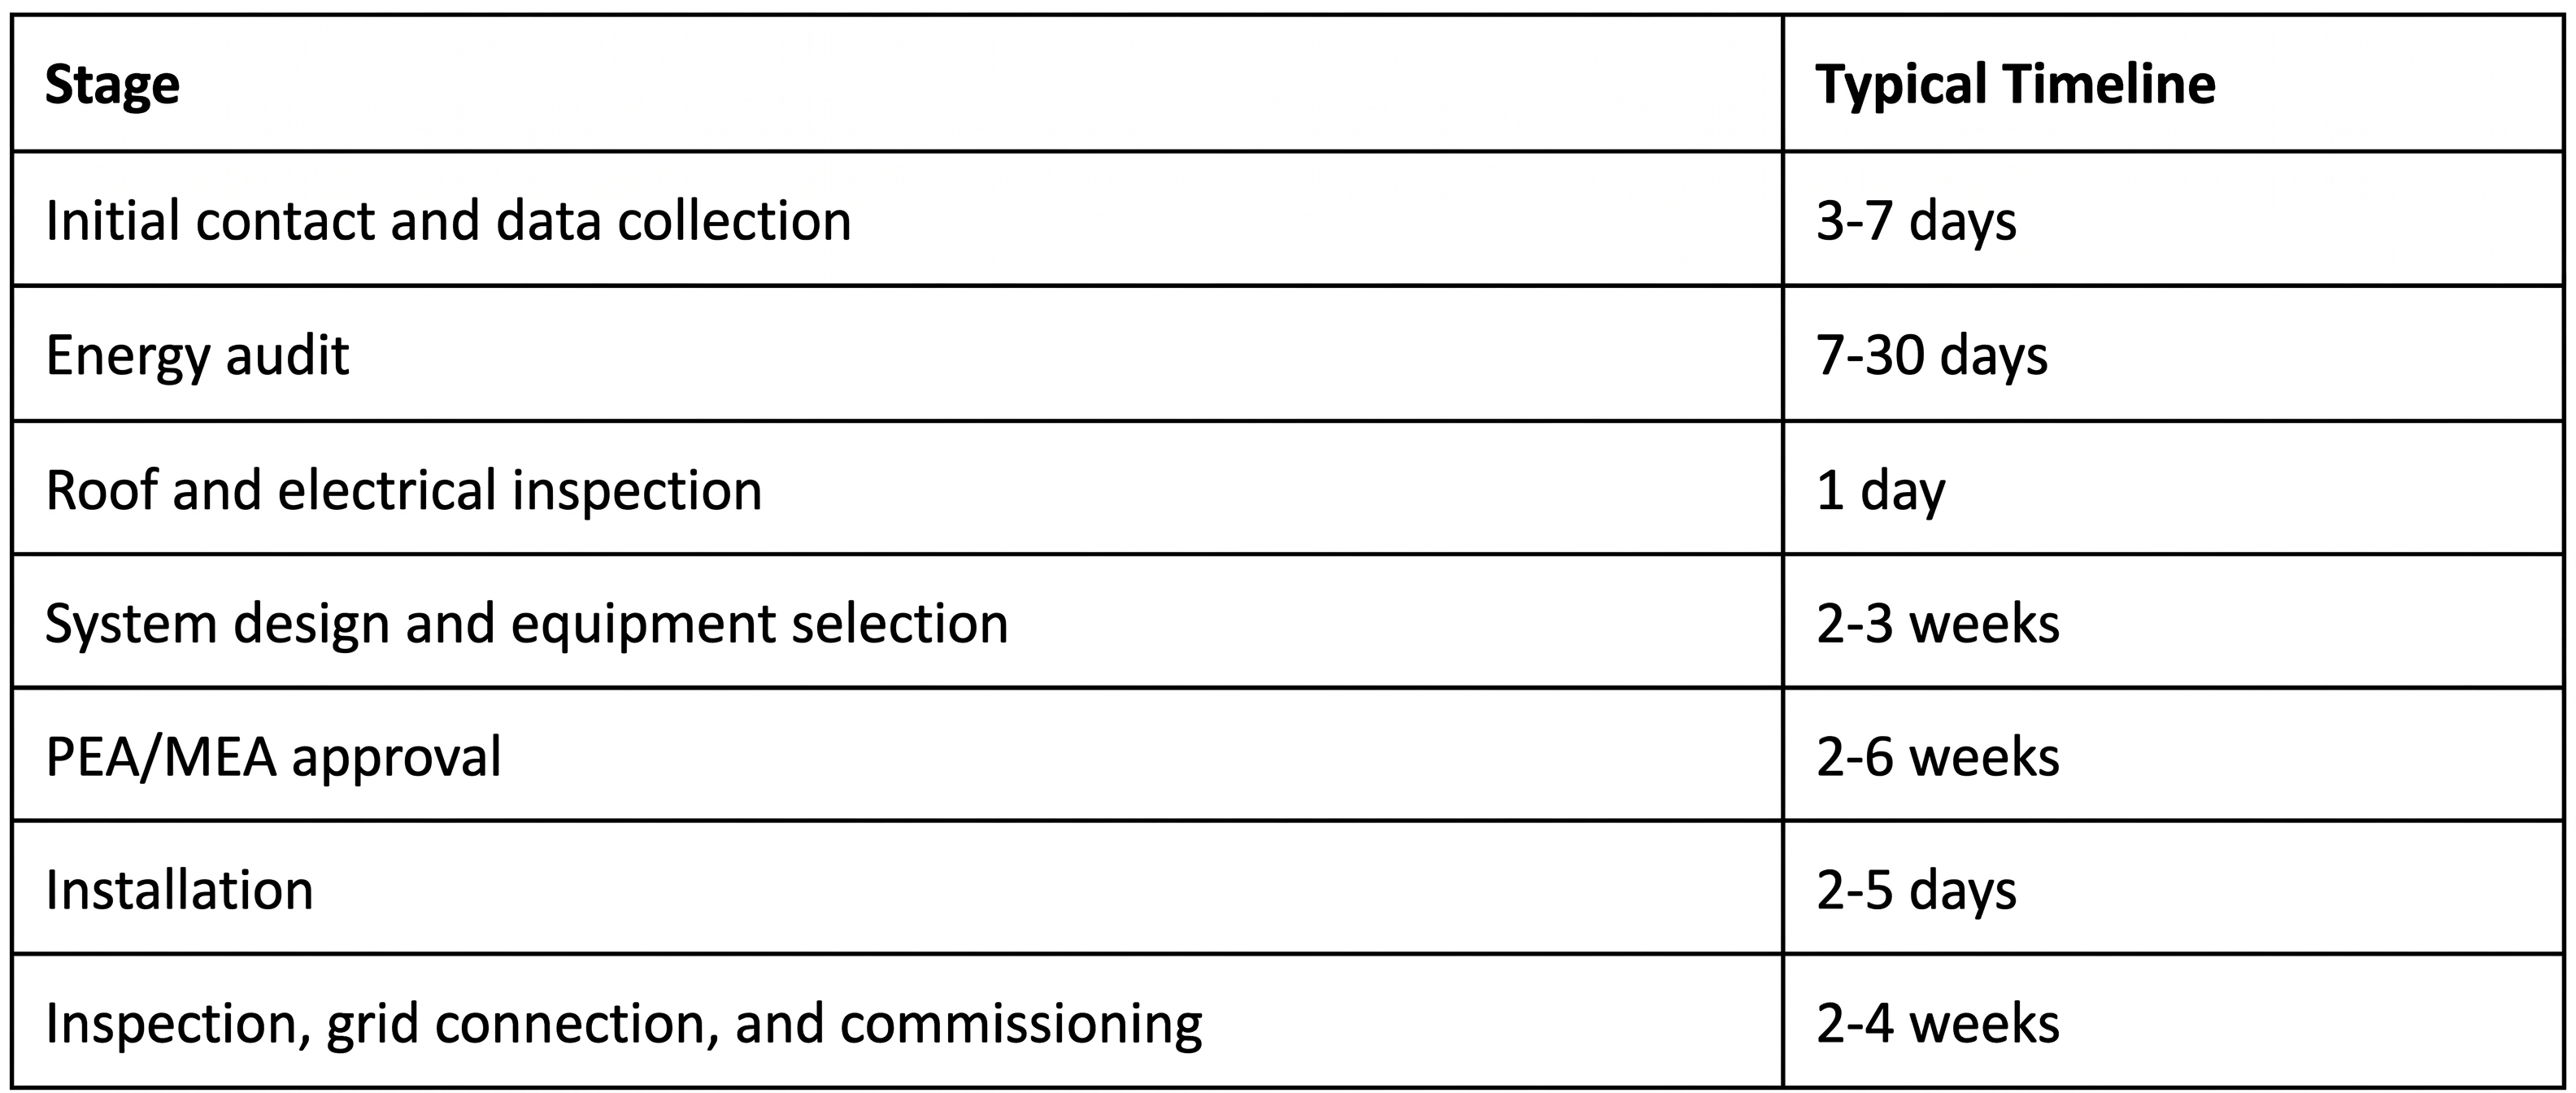
Some stages can run in parallel. For example, system design begins immediately after the energy audit, while preparation of PEA documentation often starts before equipment delivery is completed.
As a result, for a standard project the minimum realistic timeline from the first inquiry to a fully operational system is usually 2.5-3 months. If roof reinforcement, switchboard upgrades, or approval delays are required, the project can easily extend to 4-6 months.
Conclusion
Installing a solar system is not just mounting panels on a roof. It is a complex project that requires technical auditing, engineering calculations, equipment selection, and regulatory approvals. Physical installation takes only a few days. Most of the time is spent on engineering design and bureaucratic procedures. Understanding the sequence of work and realistic timelines helps not only to avoid unrealistic expectations, but also to choose a reliable EPC partner.
Request a consultation
Tell us about your property: number of buildings, approximate size, and your goals for autonomy and comfort. We will propose a solution with clear KPIs and no unnecessary engineering complexity.